An Introduction to Chalk Pastels
- Kas Rea
- Jul 5, 2021
- 4 min read
Updated: Aug 3, 2021
Welcome to my blog! Today I’ll be sharing with you the basics of chalk pastels, including different types of pastels, additional tools, surfaces and brands.
Chalk Pastel Sticks
These are sticks that are long rectangular blocks and come in a variety of colours.
Great for beginner to professional artists.
Sticks are great for covering bigger areas such as backgrounds.
Chalk pastels sticks are delicate. However, if they do break, you can still use them.
Pastels come in the categories of hard or soft. The softer the pastel, the more smooth and easy to blend.
They typically come with a wrapper for each stick to protect your hands from getting messy.
I recommend not sharpening them, since they are not the same fit for a pencil sharpener.
Pencil Chalk Pastels
A pencil form of chalk pastels.
Great for beginner to professional artists.
These are excellent for smaller areas and details.
They can be sharpened with a pencil sharpener or an x-acto knife.
They are less messy compared to the sticks.

Pan Pastels
These are very soft, powdered pastels that come in a circular plastic container.
Sponges and sponge-holders can be used to apply pan pastels.
Containers can be stacked together for easy storage.
Pan pastels are extremely vibrant and are an absolute delight to use.
These are some of the most delicate art supplies and I recommend them for intermediate-professional artists.

Colour Shapers/Blenders
These are used to blend your pastels, both sticks and pencils.
They are rubber-tipped ends. The ends are typically round or flat. I prefer the round ones.
Colour shapers come in a variety of sizes. The higher the number, the larger the size. My favourite sizes are 0, 2 and 6.
To clean your colour shapers, use a dry clean cloth or your fingers to wipe away the colour.
They last a long time, I’ve had some for up to 7 years!
You can also use blending sticks with pastels.

Taking Care of Chalk Pastels
For sticks, keep them in the containers they come in when you buy them. There is often foam or plastic inside the container to protect them from breaking and clanking together.
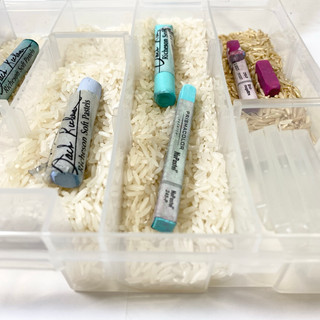
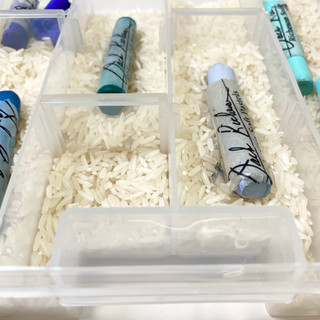
Another option is to store them in containers with uncooked rice. It sounds silly, but the rice protects the pastels, similar to foam. This works great if you have more pastels that you bought individually.
For pastel pencils, also keep them in their original container. Another option is to put them in a box, plastic case, or pencil holder.
Whichever approach you use, just remember to protect your pastels from hitting against each other, as this is how they can break and the colours can get contaminated.
Surfaces
Pastel paper comes in a variety of sizes and colours. I recommend using pastel paper for beginners and for studies.
Pastel paper has a textured surface called a “tooth”. The tooth texture grabs the pastel and holds it in place as much as paper can.
Pastel board is another surface option and has a highly textured surface that excellently holds pastels.
Boards are stronger than paper but also more expensive. I recommend this surface for intermediate to professional artists.
Velvet and suede boards are another great surface. These hold pastels the most and provide a rich drawing experience with their ultra-soft surface. I recommend velvet and/or suede for intermediate to professional artists.
How to protect your art
To prevent unwanted smudging and fading, use a fixative. Fixative is an aerosol spray can that is clear and keeps your artwork safe. There are two kinds of fixative, final and workable. I suggest the workable kind, which allows you to go back in and do touch-ups, while the final does not.
Fixative can also be used for pencil drawings and charcoal.
Use this product outside only. The fumes are intense and a mask should be worn. Children should have supervision.
There are some new fixatives that are indoor friendly, but I do not recommend them as they still smell and do not cover large areas.
Spray 1 arm's length away, if you’re too close the spray will darken your artwork.
Make sure your artwork is firmly taped or attached to a solid surface, such as a drawing board. Do not let your drawing blow away in the wind! Also, double-check that it is not raining or snowing.
Test the spray on pavement or grass to make sure it’s not clogged or bubbly.
2 coats on your finished artwork are good. With workable fixatives, you can spray a few more times while you’re still working on a piece. The spray will make it easier to layer on more whites and brighter colours.

Brands
I enjoy Prismacolor, a company that makes pastels and also coloured pencils, markers and more.
Another great brand is Carbothello. I often use their pencil pastels and they’re great for beginners to professionals.
If you’re looking for a top-notch brand, Jack Richeson's are wonderful. They’re very soft, handmade and are of excellent quality.
There are a lot more brands out there, these are just my favourites. Remember to buy local whenever possible!
Putting it all together
In the artwork below, I've combined these art tips and recommendations.
For the majority of the artworks, I used a combination of pastel pencils and sticks.
For every piece, I used my colour shapers/blenders.
The surfaces are mostly coloured pastel paper, and some are on board and others on suede.
Every piece has been sprayed by a workable fixative.
That’s it for now! Thank you for reading, I’m so glad you’re here.
Much love,


Comments